This week we shot the 'U Can't Touch This' spoof that was going to feature in our music video. This was possibly the hardest one we have had to do because it requires a specific costume in which we had to luckily borrow from a source at school. Once we had the costume we where then able to get the green set up are start to shoot. This required us to learn and do the dance moves to the original song. Although it was humorous to do, we had to make sure that they where as convincing as possible, so the video worked. There was not much else that we did differently to the other music video spoof that had the same process. Also this week me and the head editor collected all the footage we had and though about what we where going to begin with. Obviously we have already edited the Queen spoof section, but now we needed to decide who was going to do the green screening and who was going to do the main editing. I decided to do all the editing that needed to be done involving the green screen, which I did on Adobe After Effects as I gave the best results. The head editor focused on all the other editing on Final Cut Pro. We found that this was the best way to work as it was quick and avoid confusion. This week we have managed to get a large part of editing done, for example the green screen Bieber, Macarena and Cha Cha Slide footage and also all the hall footage in place. Overall we have accomplished a lot this week and next we need to plan the Gangnam Finally and edit the rest of the footage.
Thursday 28 February 2013
Friday 15 February 2013
Journal Six
This week we decided to shoot the the hallway scene of our music video. Due to the incapability to shoot in a straight corridor, we chose to shoot in full school building environment; including having our character running around, down stairs and through doors. This makes it a lot more action packed and exciting in comparison to the original idea. We found that the broadcasting camera on the dolly made our shots very nice and profession which what we wanted this part of the video to look like. It allowed us to do some tracking shots that may not of been able to do with the other cameras or with out the dolly. This is the reason another reason why we strayed away from following the storyboard as well the fact we changed the idea. We also had to organise some extra actors to appear in the background of our classroom scene, so we need to ensure these people where able to appear in the Gangnam Style spoof at the end. This proved to be a challenge as we had to get reliable and willing people to stay committed to our video free of charge. The next video we need to shot is the 'U Can't Touch This' spoof in which we will film next week.
Thursday 14 February 2013
Editing - Chroma Keying
 |
| This is the window that appears when you open up Adobe After Effects. This is the primary work station I had to use when editing my green screen footage. |
 |
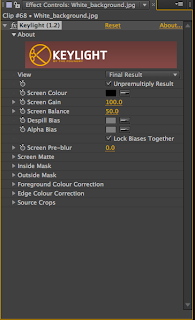
| The next step is to go to the effects tool bar and select KEY. I then needed to select the tool KEYLIGHT, which is the software that we need to used to make the green screen work. |

 |
| Now we have the tool open the first thing you need to do is to is select the pincher on the left and select the brightest green part of the shot. This is vital in getting the best results. |
 |
| Then use the pen tool to crop out the the other area of the image, revealing the the image as it will look in the final result. |
 |
| I also played with the size of my image which then allowed me to move the shot around the canvas. |
 |
| FINAL RESULT: Once I edited the shot this is the final one that has been put into the video. Overall I am happy with the outcome of the shot as it looks very clean and well chroma keyed. |
Friday 8 February 2013
Journal Five
This week, the main focus was to continue filming the necessary green shots. The music video we decided to spoof was the Macarena as we thought it was the most ambitious video to do and it would be best to get is over and done with. The shots success relied on the costumes so we had to ensure that Jason was ready to supply the outfits for us to wear. One difficulty we had when shooting this section was fitting four people in the green screens frame and then being able to shoot. The way in which we tackled this problem was to shot us separately and then put us together in post. The next video we had to shoot was the Cha Cha Slide spoof section. This is one of the easiest parts of our video as the props are a lot less difficult to provide for. This concept was set up as two people in the back ground of the shot and one person in the front. This brought forward the difficulty in which we had to toy with the lighting of the shot as the person in the foreground was was to dark. Once we adjusted the lighting the shot work really well. Overall I am happy with this weeks progress and we hope to film our corridor and 'U Can't Touch This' spoof next week and then progress to the editing stage.
Lighting Problem
Subscribe to:
Posts (Atom)


